Welcome to the PoE Texas Manual for the GBTS-10-8-55V370W!
The purpose of the manual is to help you quickly and effectively navigate the installation and functions of your new GBTS-10-8-55V370W.
Our goal is to make our products as intuitive and simple to use as possible, so we value your feedback and questions directly to us at service@poetexas.com. Phone +1-512-479-0317.
Or you’re always welcome to leave questions or comments on our product pages: GBTS-10-8-55V370W

What’s Inside

PARTS LIST:GBTS-10-8-55V370W
- 1 X PoE Switch
- 1 X Rack Mount Kit – Does NOT include the rack nuts and bolts!
- 4 X Desk Mount Rubber Pads
- 1 X AC Cable
You have everything you need to get your switch up and operating. Let’s get started.
GENERAL INSTALLATION
To deploy your new uPoE or IEEE 802.3bt switch, you really only need three key things:
- AC power – 120 VAC 60 Hz or 220 VAC 50 Hz – 500 watts
- Gigabit Uplink Data on the RJ45 por or Small Form-Factor Pluggable Fibers slot
- Space:
- 1 unit of 19″ rack space
- 17 1/2″ wide by 9 1/2″ long desk space
* Optional: If you’re rack mounting it, you do need nuts and bolts to mount it on the rack.
That’s it! It’s designed to be a simply, cost effective, high powered switch you can implement quickly. You don’t need configuration cables, software downloads, apps, or certifications to use it!
Your switch has eight Gigabit PoE ports, two Gigabit data only ports, two SFP slots, and an LCD status display. Not a lot to worry about here. Let’s show you how it goes together.

Put it together:

DESK MOUNT:
If you’re going to set this on a desk or a shelf, you simply stick the included rubber feet on to the bottom of the switch in the small square indentations provided. You don’t have to screw on the rack wings unless you just like the look of them.
RACK MOUNT:
If you plan to mount this into a rack, simply use the small screws to attach the rack mount wings. You’ll need a small philips head screwdriver for this.
The kit does not come with the hardware to mount it to the rack, so don’t forget to pick those up.

Now you can plug it in using the included AC cable to power it up.If you’re grounding your network*, you can use the earthing lug on the back of the switch.* You might be tempted to overground your network. Only ground your network in one location and ground it well. Adding more than one grounding point could actually introduce noise to your network.gs.

Let’s power this thing on and configure it!
CONFIGURATION
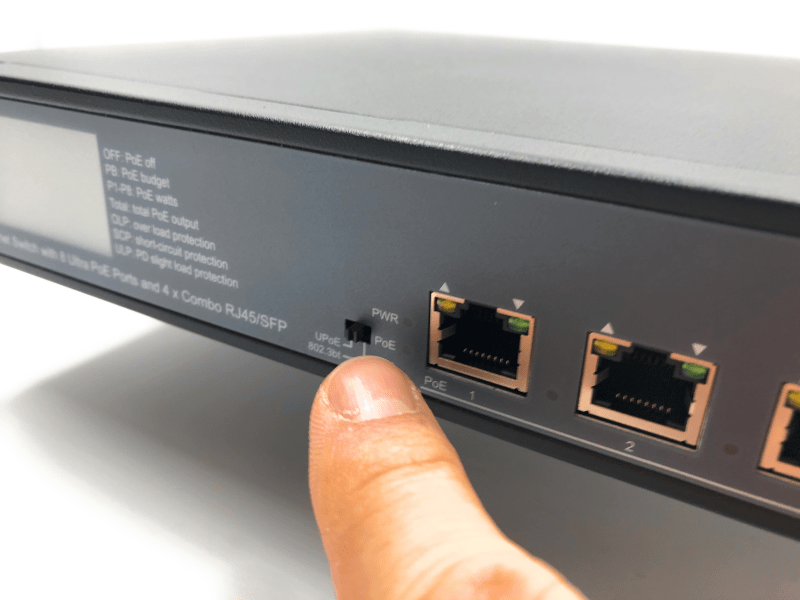
Okay, I told you there wouldn’t be any configuration. I lied. You do have to pick whether your network needs IEEE 802.3bt Type 4 PoE or uPoE. There’s a table down below that will layout the technical details, but here’s what you really need to know:
IEEE 802.3bt will be compatible with newer, higher power devices that say IEEE 802.3bt.
uPOE will be compatible with pre-standard devices that typically say PoE++ or UPOE.
I tell you this now so you can decide before you start connecting your devices. All you need to do is slide the selector switch to the type of PoE you’d like. See, not so bad afterall.


ON THE LCD SCREEN:
The LCD screen will tell you a lot about what’s going on really quickly with your network. You can:
- See how much power your device is drawing or whether it’s on or off
- If your device is having an issue because of underloading*, overloading, or a short circuit
- What your total output power is and what your power budget is
*Underloading is a condition where your PoE device isn’t drawing enough power to keep the PoE on. If you’re using a PoE splitter, you can try plugging a device into to start drawing power. Otherwise, contact us at service@poetexas.com for support.
LED LIGHTS: All the fun blinky lights!
The table here shows all the details. What you really want to check for is that the only light blinking is the LNK/ACT lights. If other lights are blinking, you have an issue.

Technical Specifications
Product Specifications
| AC Plug Connector Type | C14 |
| Data + PoE Ports | 8 |
| Data Ports | 4 (2-Gigabit and 2-SPF) |
| Data Rate | Gigabit |
| Display Type | LED |
| Input voltage | 110 – 220 VAC |
| Max Power for Kit | 370 Watts |
| Max Voltage | 55 Volts |
| Mount Type | 1U Rack Mount |
| Operating Humidity | 10% to 90% |
| Operating Temperature Range | 0-40 C |
| Output Voltage | 55 Volts |
| PoE Method | IEEE 802.3bt |
| PoE Standard | IEEE 802.3bt |
| PoE Standards Supported | uPoE, IEEE 802.3bt |